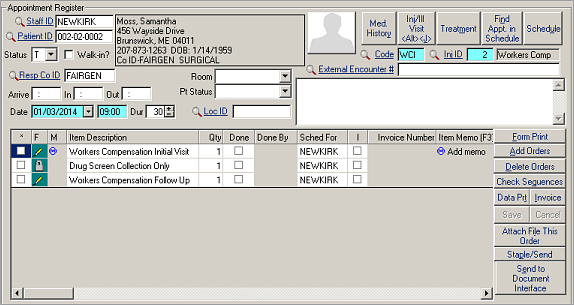
Appointment Register Screen
The Appointment Register screen is used for finding, adding, and editing appointments and attached orders.
You can access this screen from the schedule grid in several ways:
- Click Find/Register.
- Press Alt+N.
- Double-click the time slot you want to use.
- Click in the time slot you want to use, right-click, and choose Add Appointment.
| Label | Description |
|---|---|
|
Staff ID |
The staff person for whom you are making an appointment. This ID is carried over automatically from the schedule grid if you started there, or will contain the ID of the person with whom you last worked. If incorrect, enter or select it manually. Some clinics schedule a room rather than a particular person initially, and correct the appointment when the actual physician is known. |
|
Patient ID |
A patient identifier that can be a system-generated random number or the patient's SSN. Press F5 or use the search feature to view and select a patient. Special coding also can be used here. Enter #, T or @ to use the automatic numbering system to make a temporary ID. For more information see Creating a Temporary Patient ID. Type NS to create a single screening appointment to handle a group of patients with identical needs. For more information see Multi-Patient (NS) Appointments Type an exclamation point (!) if you want to skip this field and type in the text field adjacent. You would do this if you were creating an appointment for a meeting or other non-clinical event. |
|
Unlabeled text block |
Name, address, phone, birth date, employer, and (if available) department of the patient whose ID is in the previous field. Note: The 2nd address line, if one
exists, is suppressed in order to display the Company and Dept IDs.
If the Patient ID is temporary, type the name of the patient here, last name first. If appointment is for unknown multiple persons, enter a description of the purpose. If this field is dimmed and you want to type here, go back to the Patient ID field and enter an exclamation point (!). |
|
Patient Photo |
Patient's photo (optional). See Adding a Patient Photo. |
|
Status |
Status of the appointment. Appointments normally begin as Appointment and change to Canceled, No-show, or Treatment later. Changing from A to T will enter the Arrived time automatically if the appropriate option under the Scheduling Options portion of the Program Preferences screen has been activated. See Scheduling Options. |
|
Walk-in? |
Check this box if the patient came in
without an advance appointment.
|
|
Code |
This important three-character code describes the type of appointment, but also controls much of the behavior on this screen. Use the lookup or press F5 for a list view of these codes, which are known as Appointment Types. This code controls whether the button to the right of Medical History will offer access to the Inj/Ill Visit screen, the Treatment screen, or no specialized screen. It also controls what you see as a default when you are asked to enter the Treatment Description as you save the appointment. The code can be used for statistics of visit activity, and is displayed on the schedule grid to provide a quick understanding of the purpose of the visit. See also Appointment Types for setup information. |
|
Inj ID |
ID number required for the current injury/illness or injury/illness related to a rehab case, not required when the patient on the appointment has a temporary patient ID or for screening visits. If the visit is for a new injury, the registration clerk should at least start the injury by completing as much as possible of the first two lines of the Injury screen. When working on a rehab-related appointment, some clinics maintain separate Injury IDs for rehab, to keep rehab treatment entirely apart from injury care. Be sure to follow the standard practice for your facility in such situations. |
|
blank field |
This uneditable field indicates whether the injury/illness currently displayed is a worker's compensation event. If you need to change the WC status of any injury, you must do so from the Injury screen, not from this screen. To jump there, simply place the cursor in the Inj ID field and press Ctrl+J. |
|
External Encounter # |
This field contains an external system encounter number for inclusion in outbound HL7 interfaces: Continuity of Care Records, Document Interface, Drug Test, Lab, and Radiology. If you use the SYSTOC HL7 ADT Import interface, the number is imported (if included in the inbound message) when you add an appointment. Saving the number here updates Encounter Information. You can also type the number in the field, press Ctrl+J to jump to the External Encounter screen to add the number, or use the lookup to search for a number. If you do not find the number on lookup, click Add on the lookup screen to go to Encounter Information to add the number. See External Encounters. |
|
Resp Co ID |
When you tab through this field, the Company ID fills automatically from the injury information. If there is no injury, you are asked if you want the bill to go to the current employer. Note: This ID indicates the company that
is responsible for payment; be certain it is correct!
If no company is responsible (for example, a private patient visit) leave it blank. Make it a habit to verify the Company ID with the patient upon arrival. If you change the responsible company on an existing appointment, the program will ask if you want to delete all the orders. As long as none of the orders have been worked on, you normally should delete them, and select the orders again, as there may be different established procedures for the new company. |
|
Room |
The room or area currently occupied by the patient. The information in this field should be modified as the patient changes locations in the clinic during the visit. Select user-defined entries from the field's drop-down menu. Entries can be modified here or on either of the appointment tabs on the Clinical Work Area screen. The default for the initial setting can be set by the clinic. See Scheduling Options for more information. |
|
Pt. Status |
The patient's current state, such as "needs nurse" or "waiting for doctor." The information in this field should be modified as the patient's status changes during the visit. Select user-defined entries from the field's drop-down menu. Entries can be modified here or on either of the appointment tabs on the Clinical Work Area screen. The default for the initial setting can be set by the clinic. See Scheduling Options for more information. |
|
Note |
This box is for comments. The field scrolls and is larger than it appears. |
|
Arrived |
For quality control purposes, enter the time the patient arrived. If you check Walk-in when adding a record, it fills automatically with the current time. This field can be set to fill automatically when you change the appointment from an A to a T, if desired. See Scheduling Options. |
|
Time In |
The time at which the patient met with the clinical staff. |
|
Time Out |
The time the patient was discharged. |
|
Date |
The appointment date; see information under Time, below. |
|
Time |
The appointment time (in 24-hour time). To select the date and time from the schedule grid when you initiated adding an appointment on the register screen, click on Schedule. The schedule displays with the cursor as a stopwatch. Single-click on the desired time slot and then double-click. You are returned to the Appointment Register screen with Date, time, and Duration filled in. You can adjust the duration time if you need more time for the appointment. |
|
Duration |
The length of the appointment in minutes. See Appointment Types for instructions on how to set custom duration times for visit types. |
|
Loc ID |
Remote clinic Location ID, will autofill with the Location ID of the data entry person who is currently logged on to SYSTOC. Be careful to change this if you are making appointments for people who are not at the same location. Can optionally be made a required field. See Scheduling Options. |
|
Hidden fields |
The ID of the User who first adds an appointment, as well as the User who last changed it, with date, are recorded in fields that are visible if you scroll the list all the way to the right. This can help the manager determine when an appointment was created, which employees made changes to appointments, etc. |
| Orders-Related Buttons | |
|
Form Print |
Some forms need to be printed for the visit, rather than used electronically. This button will print the Flow Sheet and any form that is attached to an order on the currently-displayed visit, provided that the Print from Form Print field on the task prototype is checked. |
|
Add Orders |
This button adds orders for this visit. Once added, the orders display in the center of the screen. See Adding Orders to an Appointment (for the first order), and Adding Additional Orders (for subsequent orders). |
|
Delete Orders |
Click on the box to the far left of the order you want to delete, then select this button to remove it. Note: Be careful when deleting orders, as
vital data may be lost if there is a completed form attached.
|
|
Check Sequences |
This button scrolls the view to the Seq and Status columns. To return to the original view, slide the scroll bar all the way to the left. |
|
Data Prt. |
Click on this button to jump to the appropriate data entry screen for the orders that you have selected (if appropriate), and/or to print a report. See Data and Print Button for Orders for additional information. |
|
Invoice |
Use this button to post charges for the selected order(s). If the clinic has a person dedicated to billing, it is more efficient to invoice from the Orders screen (accessed from the Options View menu). |
|
Save |
Saves any changes you have made to the orders. This button is just for orders, not for the appointment as a whole. Ctrl+S is a shortcut for all types of saving. |
|
Cancel |
Cancels any changes you have made to the orders since the last time you saved. |
|
Attach File This Order |
Select Attach File This Order and navigate to the file you want to attach. Note: You may need to change the
selection in the file type field to display the correct file.
A warning message displays in the
following two scenarios:
|
|
Staple / Send |
Send selected orders by encrypted email. See Staple and Send Charts. |
|
Send to Document Interface |
Send selected flattened charts to the document interface using the SYSTOC HL7 Exchange. See HL7 Document Interface. |

(F column) |
The circle icon indicates that no PDF form (or other file) is attached. Click the icon to launch a browsing window to select a file to attach. See Attach a File to an Order |
|
(M column) |
The blue "M" icon indicates the presence of a memo. Click the icon to display its contents. |