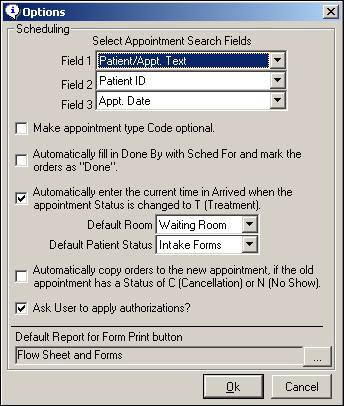
Scheduling Options
This option offers flexibility in the handling of selected scheduling activities. Carefully consider how your clinic operates and make the choices that will increase accuracy and efficiency.
| Label | Description |
|---|---|
|
Select Appointment Search Fields |
Select the three default criteria for the search fields at the top of the Appointment Register screen. Your selection should be based on the criteria your clinic uses most frequently to search for appointment and/or patient information. For any given search, the criteria can be modified by utilizing the drop-down menus associated with each field. The default settings for this option are Patient/Appt. Text , Patient ID, Appt. Date. |
|
Make appointment type Code optional. |
When checked, this option makes the Code field of the Appointment Register screen an optional field. This code is used for statistics of your visit activity and is displayed on the Schedule grid to provide a quick understanding of the purpose of the visit. The appointment-type code also appears on the Treatment screen. The default setting for this option is not checked. For efficient clinic management, we highly recommend retaining the required field status. |
|
Automatically fill in Done By with Sched For and mark the orders as Done. |
Select this option to automatically mark all orders as done and fill all Done By fields with the staff member(s) listed in the Sched For fields at the time the orders are added to the patient visit. If a service is not completed during the visit, it must be unchecked manually to avoid being counted as done. The default setting for this option is not checked. We recommend the default setting because knowing whether an order is completed, and by whom, is critical for accurate billing and effective clinic management. Furthermore, orders can be set to become Done at a specific stage as the order moves through the clinic. If you are tempted to check this option, first review Setting up Work Flow Sequences in online help to see a flexible approach to marking orders done. |
|
Automatically enter the current time in Arrived when the appointment Status is changed to T (Treatment). |
Select this option to automatically place the current time in the Arrived field when the appointment Status field is manually changed from A (appointment) to T (treatment). Checking this field allows you to also specify a default room (Place) and Patient Status. Note: If you plan to use the Clinical Work
Area, this option is highly recommended.
Patient information does not appear in the Clinical Work Area until the Status is T, and the default settings for the Arrived time, Room, and Pt Status of the patient save valuable data entry time. |
|
Automatically copy the orders to the new appointment if the old appointment has a Status of C (Cancellation) or N (No Show). |
Select this option to automatically copy the orders associated with either a canceled or a no-show appointment to a new appointment. Note that the copied orders will not display until the new appointment is saved. If this option is not selected, you will be asked if you want to copy orders when the new appointment is saved, and you will have to manually remove the orders from the original appointment. The default setting for this option is not checked. |
|
Ask User to apply authorizations |
SYSTOC can automatically display a table of active, pending, and inactive authorizations as a pop-up box on the Appointment Register. When selected, this is only activated if there is a valid authorization record that matches the Patient ID and Injury ID on the appointment. This makes it very easy to apply an existing authorization to a treatment. If your clinic uses authorizations for injury or rehab treatments, this option should be checked. The default setting is not checked. |
|
Make Location ID a required field? |
When selected, this option makes it necessary to complete the Location ID field on the Appointment Register screen before a new appointment record can be saved. Use it in multi-site clinics to ensure that Location IDs are consistently applied. The default setting is not checked. |
|
Default Report for Form Print Button |
Default setting is
Flow Sheet and Forms report.
Whatever report is listed here will print automatically when the receptionist
clicks the
Form
Print button on the Appointment Register screen. To select a
different form, click the ellipses
|