Adding Additional Orders
Once the first order for an appointment is in place, anyone on staff can easily add additional orders by displaying the appointment, and then clicking the Add Orders button. This can be done from either Inj/Ill Visit, the Appointment Register, the Orders screen, or the view (right click to see the Add Orders option).
If you accessed the Orders screen from the Options View menu, see also Adding Orders from the Orders Screen, as the procedure is slightly different. Adding an order to an appointment avoids the confusion that verbal orders or poor handwriting can sometimes cause. If the wrong x-ray is taken, for example, it is a simple matter to determine whether the technician performed the wrong task or whether the order was not correctly specified by the physician.
If the Sched For ID is not correct for the new order, you should modify the entry in the orders grid. If you change the Staff ID field of the entire appointment, the Sched For IDs for all pre-existing orders for this appointment will also change. See Change the Assignment of Orders for an Appointment.
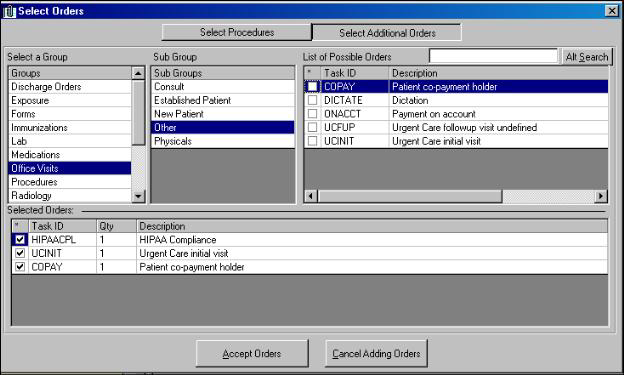
The Select Additional Orders tab groups orders so that they are easy to find. Pick the group on the far left that defines what you need, for example, Radiology. Once that choice is made, the sub-group area will have a selection of types of x-rays, for example, Upper Extremity. When you click on the sub-group, the individual orders appear, making the order you are looking for relatively easy to find because the list, by this time, is narrowly focused. What you see on your screen may not exactly match this description, since each facility can set up its own groups and sub-groups, but if your data have been properly organized, the screen should function similarly. If you know the contents of either the ID or Description for the order you want, you can bypass the Group/Sub Group approach and simply type a key word in the unlabeled field that precedes the Alt Search button, then press Enter, Alt+S, or click the Alt+Search button. This lists all the orders containing your key word in the List of Possible Orders box. Regardless of your searching method, click on the correct order when you find it.
Selected orders drop automatically to the lower portion of the screen. Here you can change the quantity if desired. When all the orders you wish to add to the current appointment are displayed in the lower pane, click on Accept Orders and you are done.
If the selected order's Description field contains a question mark, the cursor will jump straight to that mark when the user clicks once on the description. S/he can then change the question mark to the precise wording desired (e.g., change the ? to a specific room number), or edit the entire description. See Editable Grids for more information.
If the provider wishes to add an order but cannot find it, the order has not been previously defined or else has not been assigned to the appropriate groups/sub-groups. This event would be very rare once the clinic has been using SYSTOC for a while, but initially, it could be quite frustrating. A generic task prototype can be created to solve this problem (see Recommended Task Prototypes). The provider can then add an order using the generic task prototype, modify the description field to indicate what needs to be done, and (in the orders grid) click the circle icon in the F column to attach a file.