Signing a Form
Generally there are two groups of people who need to sign forms: medical staff and patients. With proper setup, the Signing Tool can be used to meet both needs.
Medical staff can create and save a signature that can be applied to forms as needed. Patients can use the tool in conjunction with a compatible signature device to sign documents in real time. Tip: when the form requires the signature of a patient, it may expedite the signing process to provide the patient with a printed version to review in advance.
The Signing Tool window is also available from .
Note: The
SYSTOC Forms Workspace uses a
different set of tools than the
Tap2Chart Workspace. See
Tap2Chart documentation for details.
To sign a form using the Signature Tool to apply either a stored signature or a signature captured in real time with a signature pad:
- From any orders grid, open the form that needs to be signed.
-
Click Signing Tool (
 ) on the toolbar at the top of the forms workspace
to display the Signature window.
) on the toolbar at the top of the forms workspace
to display the Signature window.
-
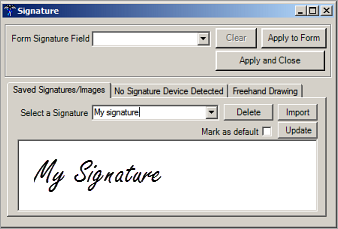
To apply a stored signature, click the Saved
Signatures/Images tab. Select the appropriate signature
from the Select a
Signature drop-down list and click Apply to
Form (the signature is applied and the window stays
open) or Apply and Close (the signature is
applied and the window closes). If your signature does not display in
the list, you may need to create and save it. See Creating and Saving a Signature for Future Use.
-
To apply a signature that you are capturing with a signature
device, click the Signature Device tab to access
the capture screen. Note: if no device is connected to the workstation,
the tab displays No Signature Device
Detected.
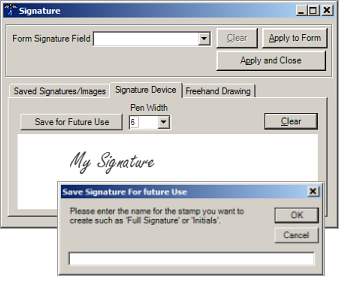
- Select a value for Pen Width. A value between 6 and 10 generally works well; it can be changed after signing.
- Sign your name with the signature device (or instruct the patient to sign). As you sign, your signature displays in the capture window.
- If you are not satisfied with the signature, click Clear and try again.
- If the signature is acceptable, select either Apply to Form (the signature is applied and the window stays open) or Apply and Close (the signature is applied and the window closes).
-
To apply a stored signature, click the Saved
Signatures/Images tab. Select the appropriate signature
from the Select a
Signature drop-down list and click Apply to
Form (the signature is applied and the window stays
open) or Apply and Close (the signature is
applied and the window closes). If your signature does not display in
the list, you may need to create and save it. See Creating and Saving a Signature for Future Use.
- If there is a Date field adjacent to the signature field on the form, click in it to enter the date of signing.
- Click Save.
- If the form is complete and you have the authority to do so, flatten it so that no alterations can be made (see Flattening Forms for more information).
Note: Signatures can be removed from a form after
they are applied, but only if the form has not been flattened.