Adding and Removing SYSTOC on a Workstation
Adding SYSTOC to a Workstation
You can set up SYSTOC on workstations in one of
the following ways:
- Copy the and SYSTOC.exe to the workstation to run Systoc only
- Copy the to the workstation to run SYSTOC with the program menu
| Consideration | Copy the LaunchSystoc.exe and SYSTOC.exe | Copy the SYSTOC.exe |
|---|---|---|
| What happens when I launch... | The SYSTOC application opens. | A menu opens and users can select one of the four
programs in the menu. Selecting Remember my choice stops the menu from opening the next time SYSTOC is launched. |
| Users who benefit | Non-administrative staff who only need access to the SYSTOC application |
|
| Upgrade effect when a minor SYSTOC version is released that does not change the version number, such as going from 7.50 to a later version of 7.50. | The existing executable files work; no additional effort. | The SYSTOC.exe must be copied to the workstation. |
| Upgrade effect when a SYSTOC version is released that changes the version number, such as going from 7.50 to 7.51 or 7.60. | The executable files must be copied from the Client Install folder after the upgrade. | The SYSTOC.exe must be copied to the workstation. |
| *You can manually create a desktop shortcut to the Client Install\SYSTOC.exe. This eliminates copying the SYSTOC.exe for each upgrade. This does not alleviate slow SYSTOC performance for users in remote locations. Copy the executable to improve the speed. |
SYSTOC requires a path to the Client Install
folder. You can provide this in one of two ways:
- Preferred Method: apply a registry key to store the path
- Alternate Method: require users to browse to and select the systoc.ini file from the Client Install folder.
Preferred method: apply a registry key:
- Create the
following registry key on the superuser's
workstation:
HKEY_CURRENT_USER\Software\VB and VBA Program Settings\SYSTOC 7.52\Install - Create a string
value in the Install key named Source and assign the
value data the path to your SYSTOC Share\Client Install folder. For example,
O:\Client InstallThe final key should look similar to the following: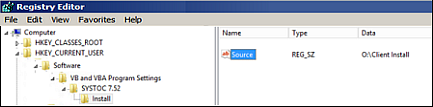
- Double-click the LaunchSystoc.exe. SYSTOC opens and presents the logon screen.
Alternate
method: browse to the systoc.ini:
- Double-click the LaunchSystoc.exe. The program immediately attempts to locate the SYSTOC.ini file.
- Browse to the Client Install folder in the SYSTOC shared folder
- Select the SYSTOC.ini file and click Open. SYSTOC opens and presents the logon screen.
Removing SYSTOC from a Workstation
To remove SYSTOC from a workstation:
- Run Remove.Systoc.exe from the Client Install folder. This removes the Systoc sandbox folder and a message is displayed when the folder and its contents are removed successfully. Read About the SYSTOC Sandbox for more information.
- Manually delete the LaunchSystoc.exe or SYSTOC.exe, depending on the method used to run SYSTOC on the workstation.
Removing Other SYSTOC Programs from a Workstation
The HL7 Import, HL7 Export, and Reconciliation Fix programs are normally run by launching
the executable (or a shortcut to the executable) that was previously downloaded. Each of
these programs also creates folders in the SYSTOC sandbox. To remove them from a
workstation:
- Open the shortcut's Properties and modify the Target by adding the following argument
to the end:
-Remove, save, and run the modified shortcut. If a shortcut is not used, either run the program with the-Removeargument or create a shortcut for the purpose. This removes the program's sandbox and a message is displayed when it is removed successfully. - Manually delete the program's shortcut. Delete the executable if it resides on the workstation. Do not delete it if it resides in the Client Install folder.