Orders Screen
Working with orders from the Orders menu choice gives you the most flexibility. It is the only view of orders that displays multiple patients and searches by Done status as well as whether the Data, Print, and Invoice activities have been completed.
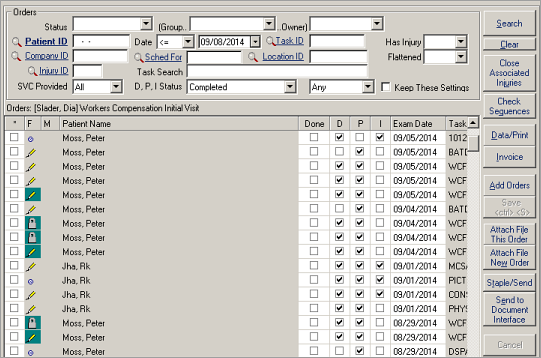
There are two main parts to this screen. The top portion contains data-entry fields that define the criteria for selecting the orders displayed in the list below. You can use any combination of these fields to search for existing orders. You must complete at least one field for the search to function. The bottom portion lists the orders found by the search.
The default status does not display all orders, but rather only the orders that still need attention, based on the Data, Print, or Invoice status of Not Completed.
Each order has a leading check box that you can select for subsequent activity such as data entry, printing, invoicing, attaching a file, or deleting. You can use the mouse or the space bar to select and clear the orders of your choice. Click on the column header marked with an asterisk (*) to select or clear the check boxes on all displayed orders.
| Label | Description |
|---|---|
| Keep these settings: | Select this box if you wish to retain the search criteria you
have entered when you leave the Orders screen to work in other areas
of SYSTOC. When you
return, the same list of orders will be visible, allowing you to
continue your work where you left off. This feature can be used to
establish an electronic "in box." Note: If you
close the Orders screen or exit SYSTOC, your
settings will not be retained.
|
| search fields | You must complete at least one field for the search to function. |
| Status | Work sequence status. |
| Group | Work sequence group. |
| Owner | Work sequence owner (staff member). The Group and Owner search criteria fields operate together. To see only work assigned specifically to you, specify your ID in the Owner with the Group blank. To see work assigned to you plus work that has no owner, specify your ID in the Owner and the appropriate Group ID for the group you want to work on. To see all the work for a particular group, regardless of who owns it, specify just a Group ID. |
| Patient ID | Patient ID for the order. |
| Date | Date, two linked fields. The first date field specifies the logic (equal to, less than or equal to, greater than or equal to) for the month, day, and year typed into the adjacent field. |
| Task ID | Task Prototype ID that was the source for this order. |
| Has Injury | Option to select Yes or No to search for orders with an Injury ID. |
| Company ID | ID for the responsible company. |
| Sched For | Medical Staff ID of the person scheduled to handle the order. |
| Location ID | Responsible location, if any. |
| Flattened | Option to select Yes or No to search for orders that have been flattened. Selecting No only searches for orders that contain a chart with a .pdf file extension or a Web Tap2Chart Place Holder. |
| Injury ID | Injury ID for the order. Performing an Injury ID lookup with an identifier in Patient ID filters for that Patient ID and Injury ID. |
| Task Search | Type a phrase or word to search for text in the Task ID and Item Description. |
| SVC Provided | Has the service described actually been provided?
|
| D, P, I Status | Data (D), Print (P), and Invoice
(I)
status of the order. Use this box to look for aspects of the order
that have or have not been completed (in other words, the data-entry
screen, a report, and/or the invoice have or have not been done). In the first box, indicate whether you are looking for All possible D/P/I status combinations, a selected status (Completed or not required), or cleared status (Uncompleted) in any or all of these columns. In the second box, indicate whether to search on all three columns (Any), just the invoice status (I), just the data-entry status (D), or just the print status (P) of any order. You must make a selection from the list. |
| Button | Description |
|---|---|
| Search | Search for orders that meet the criteria entered in the search specification fields. SYSTOC lists all matches in the grid below the search fields. |
| Clear | Clear all search field entries. Use the Clear button to remove information from a previous search, or undesired defaults that may have appeared. |
| Close Associated Injuries | Close an injury when treatment for a case is complete. This can be done from many sections of SYSTOC, see Close an Injury Case. |
| Check Sequences | Scrolls the view to the Seq and Status columns. Be sure to highlight the line of interest by clicking on it before checking sequences because the patient name will no longer be visible. To return to the original view, slide the scroll bar at the bottom of the screen all the way to the left. |
| Data/Print | Orders may require data entry in a specific section of SYSTOC, even if you are using PDF forms for much of your data entry. When an order is tagged and the Data/Print button is selected, SYSTOC opens whatever data-entry screen is indicated in the task, carrying in as much default information as possible. When you save the record, you are taken automatically to any report that was specified. If you want to return to a data-entry screen after the data entry has been done for the order (D box has a checkmark in it), right-click on the order and select the Go to data screen option. See Data and Print Button for Orders for more information. |
| Invoice | The fees for services that make up the orders must be put on an invoice. The Invoice button initiates this process. See Invoicing from Orders for complete instructions. |
| Add Orders | Click this button to add new orders. See Adding Orders from the Orders Screen. |
| Save (Ctrl+S) | Save any changes. When saving is needed, all buttons other than the Save and Cancel buttons become dim. |
| Attach File This Order |
Select Attach File This Order and navigate to the file you wish to attach and select it. Note that you may need to change the selection in the File of what type: field to display the file you want to attach. Unlike Attach File New Order, the file cannot be previewed before attaching. After successful attachment, you will be asked if you want to delete the file from the old location. The default is "No." A warning message displays in the following two scenarios:
|
| Attach File New Order | This button jumps to the same
Attach
File screen that is available from the main menu, carrying the
details of the currently highlighted appointment to that screen, see
About Orders - Attach File.
Return to the Orders screen with Ctrl+B or the Back button. Files are attached to orders with a checkmark defaulted in the Done box, so you may need to adjust your search parameters (to Done and D, P, I Status = All) to actually see the new order when you return. |
| Staple / Send | Send selected orders by fax or encrypted email, see Staple and Send Charts. |
| Send to Document Interface |
Send selected flattened charts to the document interface using the SYSTOC HL7 Exchange. See HL7 Document Interface. |
| Cancel | Undo any changes to or entries in the Orders grid since the last save, except changes to the contents of forms/charts. |