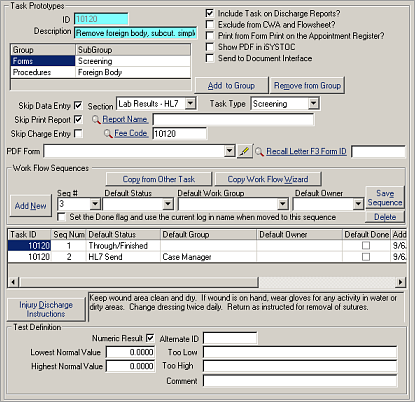
Task Prototypes Screen
The top and bottom of the screen are discussed in this section.
A separate section is devoted to the work flow sequences, see Setting Up Work Flow Sequences.
| Label | Description |
|---|---|
|
ID |
Task prototype identification code; make commonly used ones as easy to remember as possible. See Common Fields for guidelines. Tips:
|
|
Description |
Task prototype description, used when selecting tasks, appears on forms or reports. Tips:
|
|
Include Task on Discharge Reports? |
Select to have data from this task print on the Discharge Summary Report. This only applies to injuries. Tasks that are part of internal processes, reminders, etc. should not have this check box selected. |
|
Exclude from CWA and Flowsheet? |
Select to keep an order made from this task from appearing in the Clinical Work Area and/or on the Flow Sheet and Forms report. The Task Type field will automatically show non-medical if you select this Exclude option. Tips:
|
|
Print from Form Print on Appointment Register |
Select if you want the PDF form attached to this task to print when a user selects Form Print on the Appointment Register screen. Examples of forms that should be printed include a welcome letter to the patient, consent forms that the patient must sign manually, etc. |
|
Show PDF in iSYSTOC |
Select if you want the flattened PDF attached to this order to be available via iSYSTOC version 4.2 and above. Only applies to orders created after this option is checked, not to previously created orders. |
|
Send to Document Interface |
Select if you want the flattened PDF attached to this order to go to the HL7 Document Interface. See HL7 Document Interface. |
|
Add to Group |
Select group(s) and subgroup(s). Groups help providers find tasks quickly by placing them with other similar tasks. See Assigning Tasks to Groups for more information on groups and subgroups. |
|
Remove from Group |
Remove the highlighted group/subgroup from the list. |
|
Skip Data Entry |
Check to bypass going automatically to the corresponding data entry module for an order. Tips: Skip data entry if:
For more information on the differences between using a PDF or a data entry screen, see Form-based Versus Screen-based Data Entry. |
|
Section |
Select the SYSTOC screen for data entry. Complete this field to link the data entry table to the task. Even if you are skipping data entry on the SYSTOC screen, you are probably using a PDF form instead, and SYSTOC still needs to know that the task you are calling HEPBFUP, for example, is related to the SYSTOC menu choice called Hepatitis. See Sections and Task Types for more information on this field. |
|
Task Type |
Automatically categorizes the task, based
on your choice in the Section and/or Exclude from CWA fields.
Tips:
|
|
Skip Print Report |
Check to skip report printing. Tips: Some reasons you may wish to skip
report printing:
|
|
Report Name |
The report associated with the task. For example, if this task is for Vision screening, the provider might want to print the Vision Results report after the data entry is complete. |
|
Skip Charge Entry |
Check if this task is non-billable. |
|
Fee Code |
Fee code associated with task to be billed. Tips:
|
|
PDF Form |
The PDF form associated with the task. Tips:
|

|
Click the pencil icon to preview the selected PDF in SYSTOC PDF reader. |
|
Recall Letter F3 Form ID |
ID for recall letter to send to the patient. Tips:
See the Quick Guide to Recall Letters and F3 Forms and Labels. |
|
Work Flow Sequences |
See Setting Up Work Flow Sequences for information on all the fields in this section of the screen. |
|
Injury Discharge Instructions |
Patient discharge instructions when visit is an injury. This button is not available until the record is saved. Tips:
|
|
Test Definition |
This area is only available if the Task Type is Screening. |
|
Numeric Result |
Optional, check this field if the result will be numeric. |
|
Alternate ID |
Not used. Previously used with LabLink to store the lab's test component code. |
|
Lowest Normal Value |
The low end of normal for this test. Optional, for information only. |
|
Too Low |
Comment for a result that is below the Lowest Normal. Optional, for information only. |
|
Highest Normal Value |
The high end of normal for this test. Optional, for information only. |
|
Too High |
Comment for a result that is above the Highest Normal. Optional, for information only. |
|
Comment |
General comment area. |
|
Medication |
This area is only available if the Task Type is Medication. |
|
Dosage |
Dosage information. Tips:
|
|
Number |
Quantity in a typical prescription of this dose. |
|
Refills |
Number of refills permitted. |
|
Generic |
Check if a generic drug may be substituted. |
|
Dosage Instructions |
How to take the drug, displays on the screen and prints on discharge and prescription reports. The physician may modify the instructions when prescribing. Tip:
|
|
Drug Form Code |
These codes describe the form of the drug, such as tablet, capsules, liquid, etc. |
|
Memo (launched with the F3 key of by
clicking the View Memo
|
The memo is used for instructions to the staff. It prints on the Flow Sheet for the patient visit. If you are not using Flow Sheets, you can view the memo from any screen that displays the Orders. |