Report Specifications
Before you run a report from the Reports List screen you must indicate where the completed report will be sent (Display, Printer, or Export) and enter report specification values.
The content of each report varies, depending on the specifications you use and the value(s) you enter.
SYSTOC's standard reports are extremely flexible and should be able to accommodate most of your reporting needs. Take some time to experiment with a range of reporting options to see the different type of reports you can create. However, if you find that you still cannot produce the information you need, you may wish to request a custom report. See Custom Reports for more information.
| Label | Description |
|---|---|
| Destination | Indicate whether you want to Display, Print, or Export the file here. See Exporting Reports for more information. |
| Landscape? | The default printer setting for most reports is portrait mode; check this box if you want landscape. |
| Printer | Click the button to select from the printers installed on your workstation; use if Destination is a printer. |
| Export File | The name of the file you are exporting. |
| Start Page
End Page |
The beginning and ending page number fields are normally left alone. Only use these fields if your printer jams and you need to restart a report at some point other than the beginning. The computer will count the unprinted pages internally, then begin to use paper on the starting page number. |
| Copies | Number of copies you want to print. |
| Run Report | Click this button after all pertinent fields have been completed. |
Entering Report Values
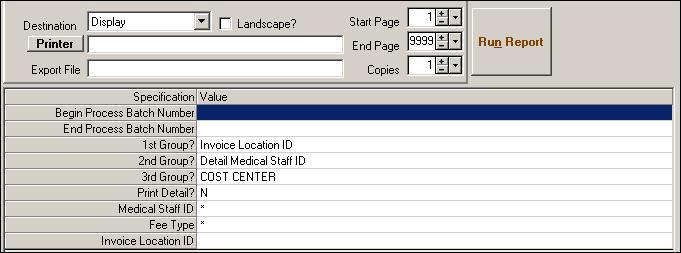
The lower pane of the Prepare Report to Run screen contains two columns. The Specification column has content that varies based on the report selected. Every cell in that column represents a single parameter of the report to be run. The Value column contains editable cells where you enter values appropriate to the specifications. Some information is inserted into those fields by default, based on the data screen you viewed most recently. If all of the default information is correct, simply press the Run Report button.
Some reports allow you to enter a Location ID or a Report Header Location ID . When applicable, the system automatically inserts the operator's Location ID into those value fields. This will either provide location-specific report data (in multi-site clinics), or it will print the Location ID as the clinic name in the report header.
If multi-site facilities are not sharing data, see Location-Sensitive Reports for a breakdown of what is visible in various scenarios. Only those individuals with appropriate security rights can erase a Location ID, thereby allowing them to view data from a different location (or all locations).
Some fields in the Value column may be left blank, while others, particularly ID fields such as Company ID and Patient ID, must be completed with an appropriate ID or an asterisk (also referred to as a wildcard), indicating "all." For example, to print a report that contains data for a specific company, insert that company's ID as the value next to the Company ID specification. If you want to print data for all companies, insert an asterisk (*) as the value. If you want data for all companies whose names begin with the letters n-e-w, enter new * as the value.
Dates may be entered in the standard format of MM/DD/YYYY, but SYSTOC also accepts Month and Day entries in single digits, and Year entries of two digits. That means you can enter the date of 07/04/2004 or 7/4/04. In most cases, when dates are displayed in reports they are shown in MM/DD/YYYY format.
If you need to enter a value or change a value displayed in a data entry field, click on that field. If data are already displayed in the field, a dark edit box will appear behind the data, meaning that it is ready to edit. Type the information you want in the field and press Enter, or select a new entry from the drop-down menu.
Changing Default Values
Many standard reports include pre-defined defaults that automatically enter the values to be used whenever the report is run. Users with appropriate rights can change the default value for any report specification in the Report Library screen. See Specification Changes Quick Guide for a step-by-step guide to changing specification defaults.
Select from List
Many Value fields contain drop-down menus, which are accessible via the downward arrow that appears after clicking on the field. Click on the arrow to view available options. One option, Select from list, allows you to search for values in a manner similar to the F5 Lookup; see below. For example, when completing the Staff ID field, choose Select from list, and the screen appears. To the right of this screen is a window entitled Return Values. Choose the desired IDs by clicking on the one you want (using the search capability to find it, if desired) and then clicking on the Add Value button. This places the names in the Return Values window. Remove names by selecting them and then clicking on the Remove Value button.
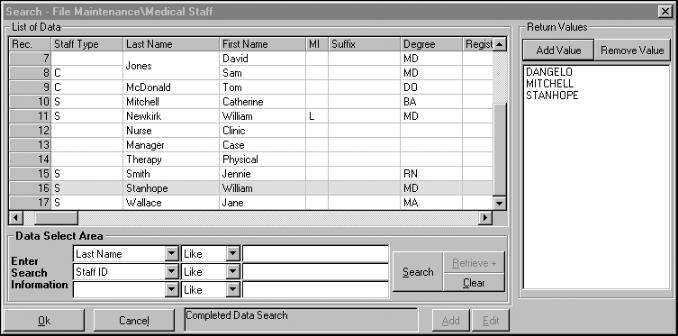
Repeat this process until all of the desired names are listed, then click on the Ok button. The selected names will appear, separated by commas. Alternatively, if you know the IDs you want to select you could type them in yourself, separated by commas, with no blank spaces. When you have filled in all the desired value fields, press Alt+N or click on the Run Report button. Those values will appear in appropriate sort order on the report (from lowest value to highest value), regardless of the order in which they were selected.