Data Screen View
To move the focus from the Options View into the Data Screen area, either click in the Data Screen or press Ctrl+F6. If you are on the List View, press F12 or Enter to select the highlighted record and jump to the Data Screen. As you enter data, press Tab to move forward to the next field or Shift+Tab to move backward to the previous field.
- The blue fields are required and must be completed before you can save your data.
- Dimmed fields and buttons are for display only; they are not active.
- A description of each field on the data screen appears on the System Message field, in the upper section of the screen (to the right of the Button Bar).
You can control the appearance of data that is entered or modified on data screens but has not yet been saved by selecting Highlight Changed Data? and Underline? on . This serves as a visual reminder that you must save the data in order to keep your changes. You can also select the color of the highlight from several options. See Personal Preferences for more information about these settings.
You can choose the background color of the data screen; see Color Schemes for additional information about making this selection. The default color setting for a data screen that has been saved is the same color as the background. If you have selected a background that uses an embedded image, the data screen will become opaque. Selecting Add causes the appearance of the data screen to change slightly, as a visual reminder that you have changed modes of operation.
To save your data, press Ctrl+S or the Save button. Press Ctrl+R to abandon your edits and revert to the previously saved version of the data screen. If the data screen is in Add mode and data has been entered but not saved, press ESC to discard any data that was added.
As you move from one screen to another, data for the current patient continues to display. When several records are available for the patient, all available records are displayed in the list view, while information from the first record displays on the data screen. If no applicable records are found, the new data screen opens in Add mode.
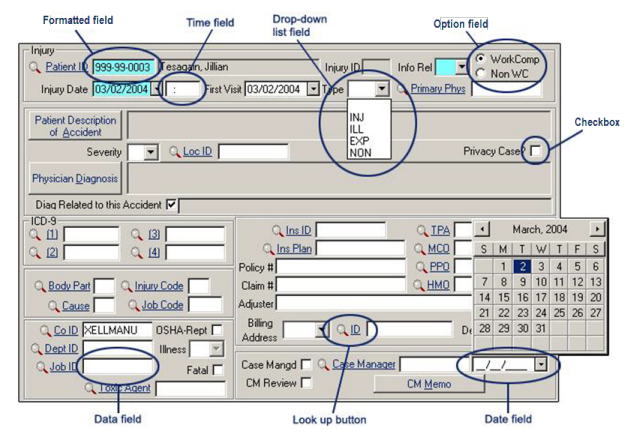
Lookup
ID codes are used to associate one record with another. In this way, a patient is linked to his company of employment, department, and job, as well as to service records for medical care and the invoices that bill for that care. Every data screen field that contains an ID code from another file has a Lookup capability. These fields have a magnifying glass icon preceding the field name, which is underlined. If you know the correct ID code, just type it in. Otherwise, press F5 or left click on the underlined prompt to call up a list/search view of the appropriate file. See Adding Data On the Fly (F5, Alt A, Ctrl B) for more information.
Drop-Down List Fields
Certain fields will only accept data entries that have previously been defined. In the Gender field, for example, you must enter M for male, F for female, or U for unknown. You can recognize these fields by the button marked by a small arrow immediately to the right of the field. Press Ctrl + up arrow or Ctrl + down arrow to display the acceptable items in the list one at a time, or press Alt + up arrow or Alt + down arrow or use the mouse to display the list of acceptable entries. As you browse the list, an explanation of each code is displayed in the System Message field in the top portion of the SYSTOC window.
Date and Time Fields
Date Fields
- When there is no date in the field, the calendar displays the current month. If a date has previously been entered, the calendar displays that month.
- The two arrows in the top corners of the calendar move the month either backward or forward.
- When the correct month is displayed, use the arrow keys to highlight the correct day and press Enter, or select the day with a single mouse click.
If you prefer not to use the calendar, you can type in the desired date or use F8 to enter today's date. When the date field appears as part of a search line, (+) plus and (-) minus buttons located in front of the calendar button let you to increase or decrease the displayed date one day at a time.
Time Fields
Enter time in 24-hour time format. For example, 1:30 pm would be entered as 13:30. Press F9 in a time field to enter the current time. Double-clicking in the Arrived, In, and Out fields also enters the current time.
Checkboxes
- To edit a checkbox, use the mouse or spacebar to select or clear the field.
- Checkboxes may appear singly or in a group.
- A series of checkboxes can be selected or cleared in any combination.
Formatted Fields
Fields in which you input phone numbers, Social Security Numbers, or dates already contain the required dashes or slashes; simply type the numbers.
Option Buttons
- Use the mouse or spacebar to select or clear the field.
- An option that is selected indicates a yes response.
- Option buttons are always found in a group of two or more; when you select one option, you reject the others.
System Messages
As you move from field to field, content descriptions are displayed in the system message field adjacent to the buttons at the top of the screen. These explanations are invalid if a secondary window overlays the primary screen.To the right of the message field, a button displays the logged in user ID. This button activates the change user function. See Change User.
